Setting Up Your Office Anywhere Web is as Easy as 1, 2, 3
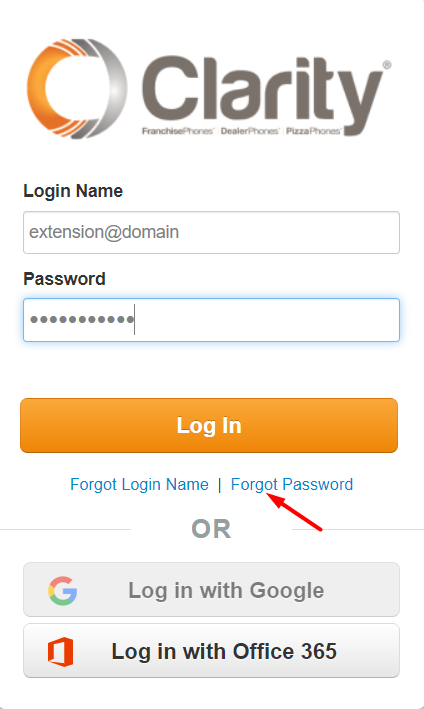
- Navigate to https://portal.clarityvoice.com, you should see the login page
-
- Login with our Single Sign-on feature using Google or Office365; or
- Enter your Extension and Domain, for example, 200@handyman, along with your password. If you don’t know your password, click Forgot Password to have a password reset email sent to you.
- Click Login
2. To launch Clarity’s Office Anywhere Web phone, click the Apps dropdown menu at the top of the page and select Office Anywhere Web

3. When first launching Office Anywhere Web, your browser (Chrome, Edge or Firefox) will prompt you to grant access to the microphone. You must click Allow
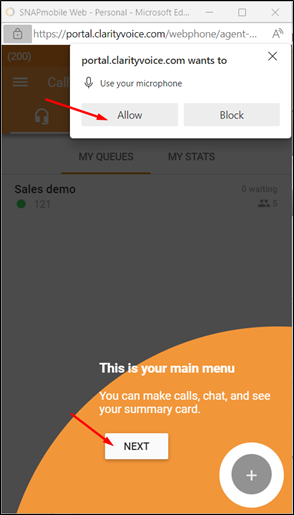
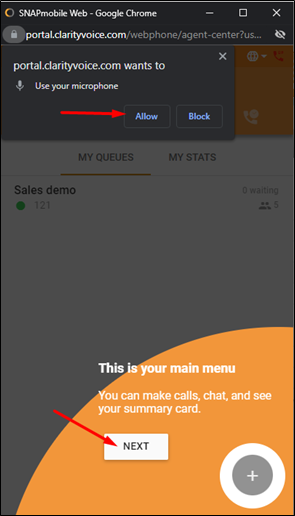
4. The web phone will also prompt you to read the tip and click Next
5. Finally, click Done and your web phone will launch

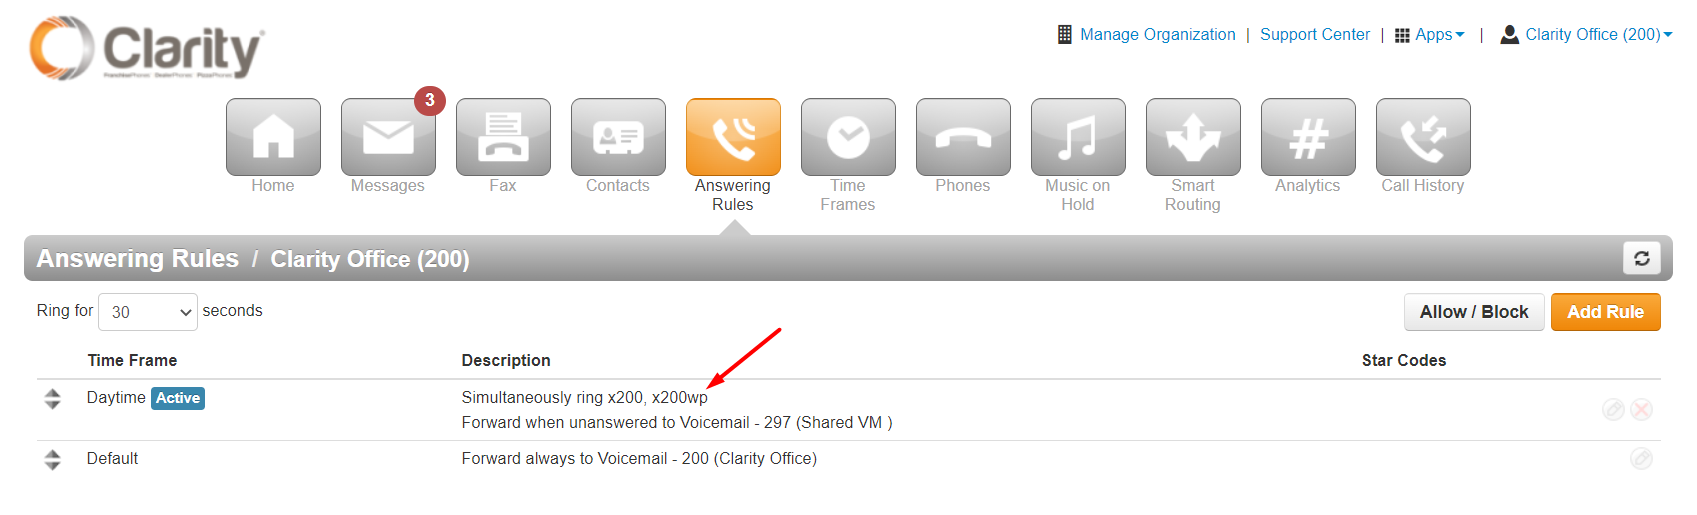
6. When first launching Office Anywhere Web, if your extension’s answering rules are not configured to ring all devices, the following message will be displayed, asking whether you would like to enable Office Anywhere Web to receive inbound calls
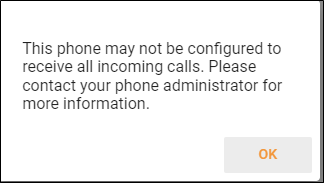
.
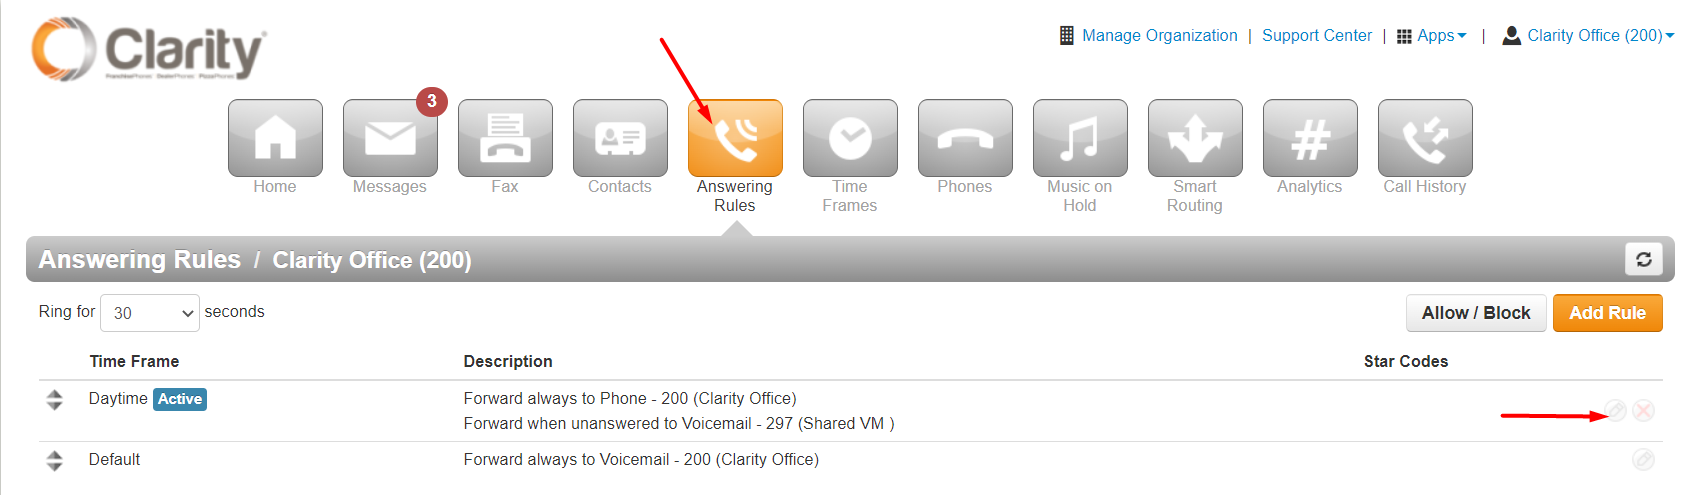
To enable inbound calling on the web phone:
1. Edit your Answering Rule by hovering over the rule and clicking the pencil icon to the right
2. Check the box next to Simultaneous Ring
3. Check the box next to Ring All user’s phones
4. Click Save
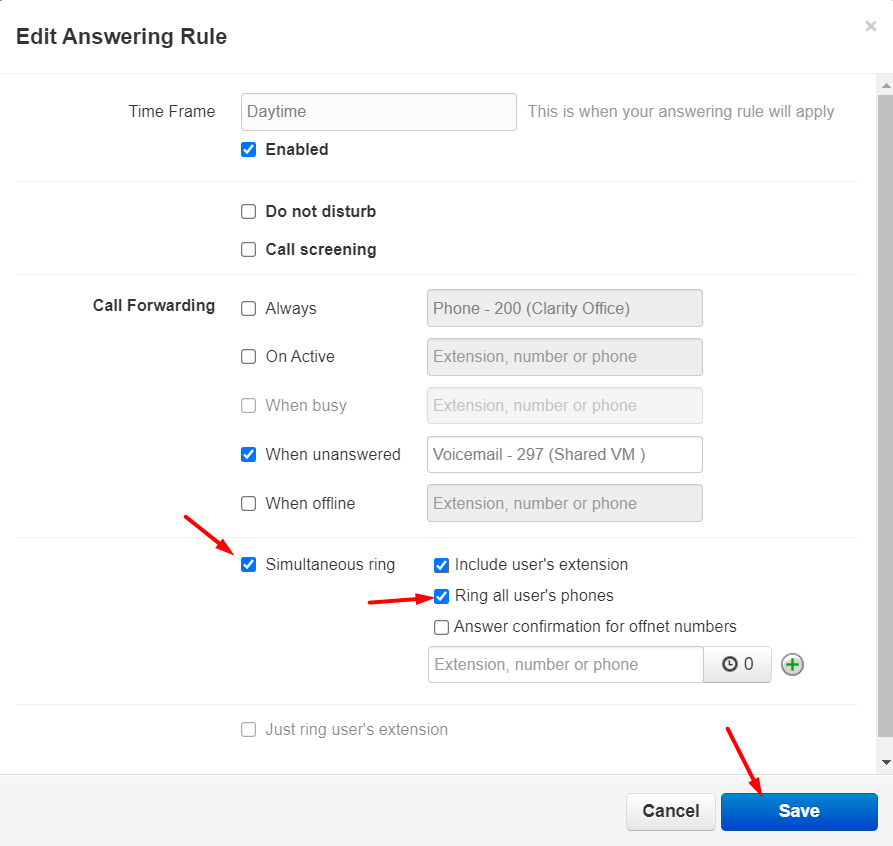
5. Your answering rule will now show the web phone (“wp”) as an active device to receive inbound calls
Using Office Anywhere Web
To make a call on the Web Phone:
-
-
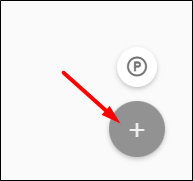
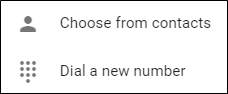
- From the Call Center, Contacts, Voicemail or Call History view, click the ‘+‘ icon in the bottom right to view the dial pad icon, then click the dial pad icon (NOTE: the Call Center view is permission based and may not be available for all extensions)
-
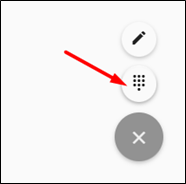
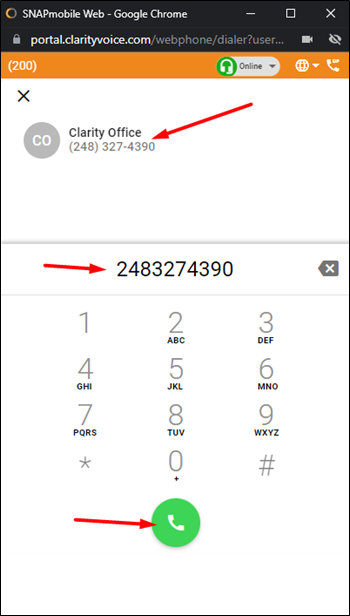
2. Dialing can be performed by either clicking on the screen number pad or dialing numbers from your keyboard keypad
3. When dialing, the top of the dial window will display autocomplete suggestions pulled from the contacts for numbers that match the current dialing pattern. When dialing is complete, press the green dial icon on your screen, or enter on your keyboard, to begin the call.
To receive a call on Web Phone:
-
-
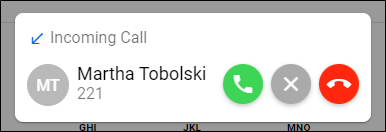
- When receiving a call, the computer will play a ringtone and Office Anywhere Web will display the following options:
- Answer – this will answer the call
- Ignore – this will ignore the call received on the Web Phone, but will still continue ringing other devices that are a part of a simultaneous ring (if applicable)
- Reject – this will reject the call from all ringing devices and will send the call to the When Unanswered rule
- When receiving a call, the computer will play a ringtone and Office Anywhere Web will display the following options:
-
Call Handling:
-
-
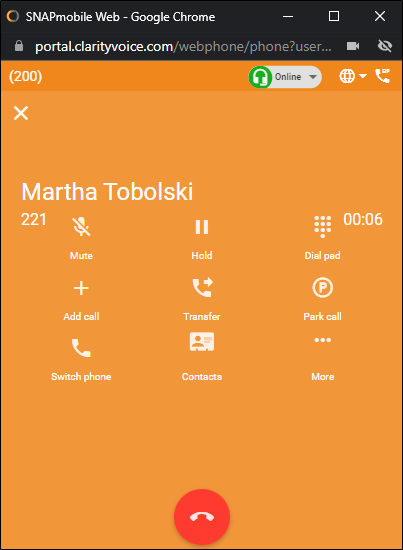
- When a call is active, the following functions will be available:
- Mute – disables the microphone
- Hold – places the other party on hold
- Dial Pad – enables entering digits at auto attendants
- Add Call – creates the second call from a contact or a dialed number and puts the first call on hold. Click Merge Calls to add the second call for a three way conference call
- When a call is active, the following functions will be available:
-
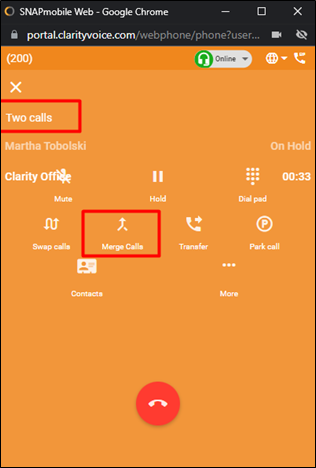
5. Transfer– allows calls to be transferred to a contact or a dialed number. Once the number is entered, to transfer the call, click the green phone icon and a new popup box will appear with a choice to either perform a Blind Transfer or an Assisted Transfer
6. Park Call– park a call to be answered by another device, for example, so another agent can retrieve it when available.
7. Switch Phone– moves the call to another device associated with the same user
8. Contacts– displays the user’s contacts and optionally creates a second call by clicking on a contact
9. More– additional options available:
-
-
-
-
- Record Call – records the call as long as on-demand recording is configured
- Hide Call – returns to the main view while keeping the call active. While the call is hidden, a Return to Call bar will appear at the top of the window
-
-
-
Appearances for Office Anywhere Web
Call Center View
Clarity has extensive call center capabilities available through the portal for users who manage or have extensions routing through a queue. The Call Center View will appear if users have an extension that has been added to a call queue.
The Call Center view offers more freedom to choose the area in which to work, as well as saves users from switching between Clarity’s portal and the web phone for information they may need. The Call Center view will present you with My Queues and My Stats tabs.
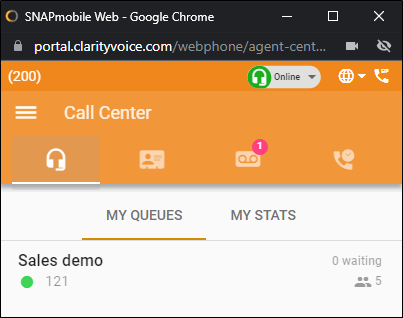
My Queues displays the queues you are logged into, the number of users assign and the number of callers waiting in the queue. From here, you can login and logout of specific queues.
My Stats displays the user’s stats using charts.
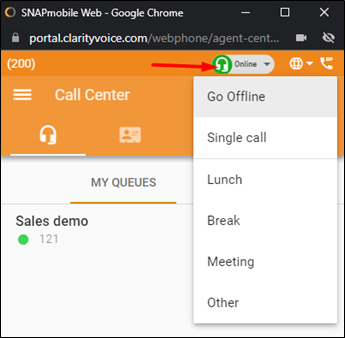
The general status displayed in the upper right will control the status for all queues. Click the dropdown next to Online and select a new status.
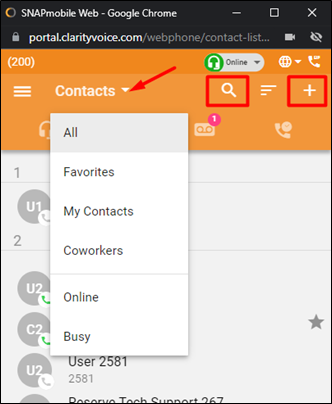
Contacts View
The Contacts view shows other users in the organization as well as any contacts that have been added in the Portal. Organization contacts show presence; indicated as a green, red or gray circle; and favorite contacts are indicated with a star.
To select a predefined filter or user-created group, click the Contacts pull-down at the top, then select the filter needed![]()
To filter/search contacts, click on the magnifying glass in the upper right, then type in the name to filter
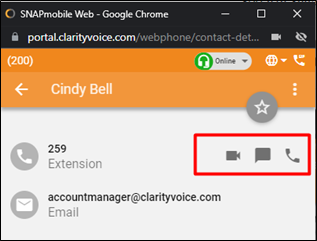
Once you’ve selected a contact, you can start a video call, internal chat or call that contact, directly from the web phone Contact view
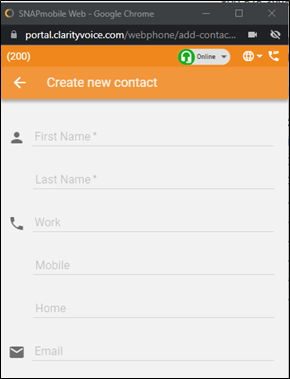
Adding Contacts
Click the ‘+‘ in the upper right corner to bring up the Add Contacts view. Complete the fields to add a contact then click the check button in the upper right to save the contact
-
-
- Clicking on the extension/phone number will dial that contact’s number
- Clicking on the email address will launch your email application with a new message to that address
- Clicking the star icon will toggle the favorite status of the contact
- Click on the three dots in the top right corner to display a pull-down menu of additional options:
-
Edit – edits the contact’s information
Copy to Clipboard – copies user data which can be pasted into another application
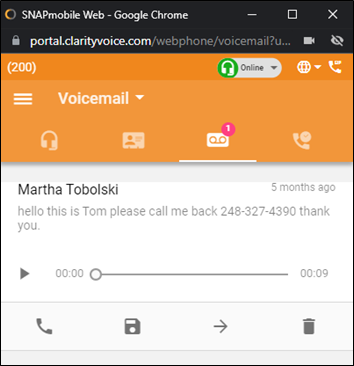
Voicemail View
Voicemail view shows the user’s voicemail box. Users can click the Play button to listen to the message or click elsewhere on the message to expand the options.
-
-
-
- Message Progress Bar – shows the current place in the message, drag and drop the circle or click on the bar to jump to a particular part of the message
- Play/Pause Toggle – click play to begin playback, when a message is playing it also becomes a pause button
- Call – call back the number, if Caller ID is known
- Save – moves messages to saved box
- Forward – forwards the message to another user in the domain
- Delete – moves messages to trash
- Transcript – the message transcript will be displayed, if available, directly below the caller name
-
-
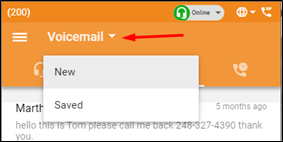
Changing Mailbox Views – by clicking on the Voicemail header, you can select whether you see New or Saved messages.
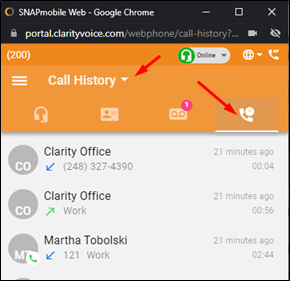
Call History View
Call History view displays the user’s call history including inbound, outbound and missed calls, by clicking the drop-down arrow.
-
-
-
- The entries displayed will show caller ID (if available), call direction (inbound, outbound or missed), call time, and call duration
- Clicking on the Call History entry will return the call
-
-
By clicking on Call History in the header you can select a view of All, Missed, Inbound, or Outbound Call History
Chat and SMS
A new internal chat or SMS message can be initiated by selecting the icon at the bottom right corner. The icon will pop out with the following choices:
Edit/Pencil icon will start a new internal chat or SMS conversation
Dial Pad icon will start a new call
‘X‘ icon will clear the menu of options
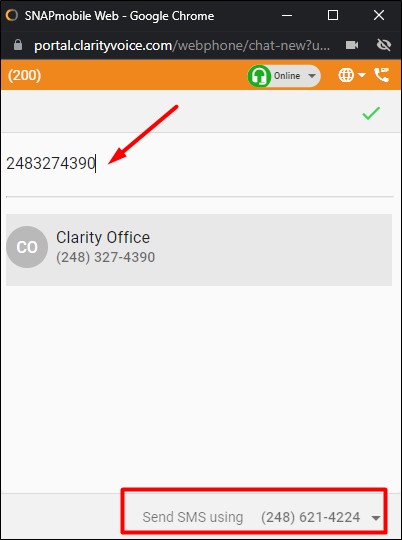
Enter the external phone number to begin an SMS conversation. If you have multiple phone numbers with SMS assigned, you may select the phone number to send the SMS from the bottom right dropdown menu
-
-
- Click the green check mark in the upper right corner to start the SMS message
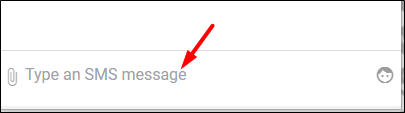
- Type the SMS message, add an attachment or emoji and press Enter on the keyboard to send
-
-
-
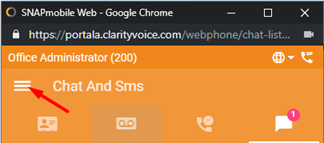
- Sidebar View – can be accessed by selecting the upper left menu icon (three horizontal bars) and closed by clicking off the sidebar. The sidebar has the following features:
- Display/Edit user profile info
- Allow access to Answering Rules (see below)
- Greetings selection and recording
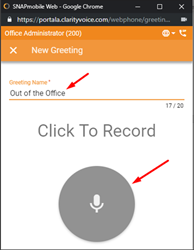
- Click Add Greeting to record a new greeting
- Add Greeting Name
- Click on the microphone icon to record
- Settings
- About
- Logout
- Sidebar View – can be accessed by selecting the upper left menu icon (three horizontal bars) and closed by clicking off the sidebar. The sidebar has the following features:
-